1. 개요
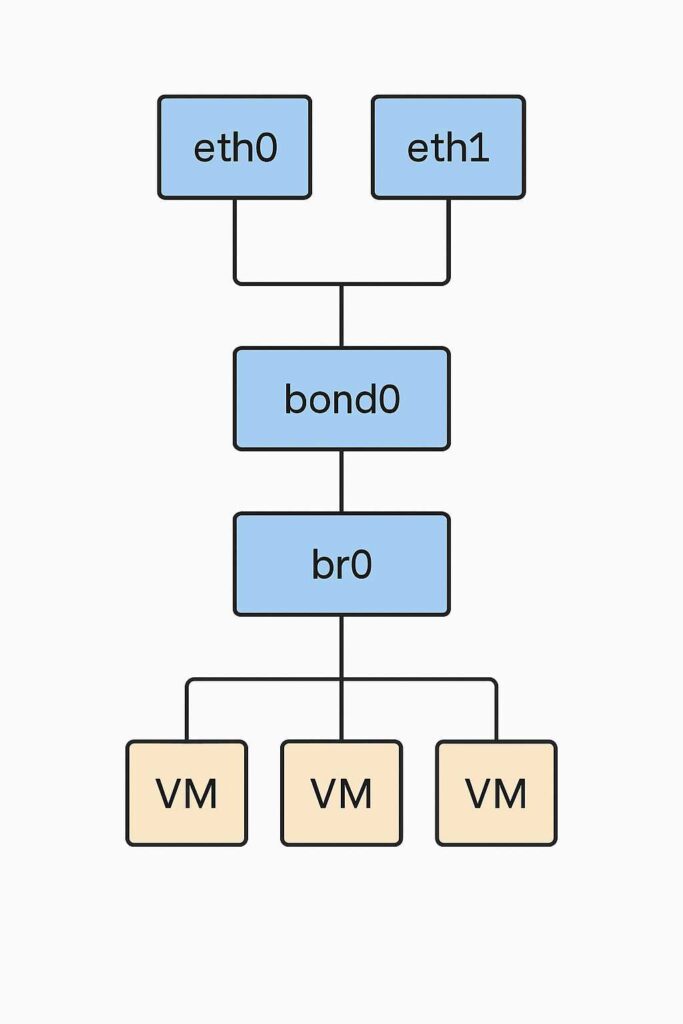
- Rocky Linux 9.5 환경에서 두 개의 NIC를 하나로 묶는 Active-Backup Bonding 구성 후, 해당 Bond 인터페이스를 Bridge에 연결 하여 KVM 등의 가상화 환경에서도 사용할 수 있는 고가용성 네트워크 구조를 설정합니다.
2. 버전
- Rocky Linux 9.5
3. 설명
3-1. Bridge 란?
- Bridge는 리눅스에서 두 네트워크 인터페이스를 L2 계층(스위치처럼)으로 연결해주는 가상 인터페이스입니다.
- Bridge는 주로 가상 머신(VM) 이나 컨테이너(LXC) 에 물리 네트워크를 투명하게 연결할 때 사용됩니다.
3-2. Bridge를 사용하는 이유
- KVM, LXC 가상머신에서 외부 네트워크에 직접 접근 가능합니다.
- IP를 NAT 없이 직접 할당할 수 있습니다.
- VM이 마치 물리 머신처럼 같은 네트워크에 있는 것처럼 구성 가능합니다.
3-3. 구성 구조

4. Bond 인터페이스와 Bridge 연동
4-1. Bond0의 IP 설정 제거
# nmcli connection modify bond-bond0 ipv4.method auto
# nmcli connection modify bond-bond0 ipv4.gateway ""
# nmcli connection modify bond-bond0 ipv4.addresses ""
4-2. Bridge 인터페이스(br0) 생성 및 고정 IP 설정
# nmcli connection add type bridge ifname br0 con-name br0 connection.autoconnect yes
# nmcli connection modify br0 ipv4.addresses 192.168.204.245/24
# nmcli connection modify br0 ipv4.gateway 192.168.204.254
# nmcli connection modify br0 ipv4.method manual
4-3. Bond0을 Bridge에 연결
# nmcli connection modify bond-bond0 connection.master br0 connection.slave-type bridge
4-4. 시스템 재부팅
# reboot
5. 상태 확인
5-1. Bridge IP 확인
# ip address show br0
출력 예시:
4: br0: <BROADCAST,MULTICAST,UP,LOWER_UP> mtu 1500 qdisc noqueue state UP group default qlen 1000
    link/ether 00:25:90:e0:b6:0e brd ff:ff:ff:ff:ff:ff
    inet 192.168.204.245/24 brd 192.168.204.255 scope global noprefixroute br0
       valid_lft forever preferred_lft forever
    inet6 fe80::4706:a3d3:c480:6e4b/64 scope link noprefixroute
       valid_lft forever preferred_lft forever
5-2. Bridge 상태 확인
# bridge link
출력 예시:
5: bond0: <BROADCAST,MULTICAST,MASTER,UP,LOWER_UP> mtu 1500 master br0 state forwarding priority 32 cost 100
5-3. 전체 연결 확인
# nmcli connection show
출력 예시:
NAME        UUID                                  TYPE      DEVICE
br0         5e152a33-5dbf-4e01-94bf-40a460a98401  bridge    br0
bond-bond0  6fa17a23-253f-4fa3-9d65-731e9e6ed934  bond      bond0
slave-eth0  93a6c66e-39eb-4a55-a15c-0d7f90cf8895  ethernet  eth0
slave-eth1  10c015af-6fe5-4e1a-aebc-cf6f66866634  ethernet  eth1
lo          3b07d962-ae91-46db-9e91-026d752bdbc6  loopback  lo
6. 장애 전환 테스트
6-1. 현재 Bond 상태 확인
# cat /proc/net/bonding/bond0
출력 예시:
Ethernet Channel Bonding Driver: v5.14.0-503.14.1.el9_5.x86_64

Bonding Mode: fault-tolerance (active-backup)
Primary Slave: None
Currently Active Slave: eth0
MII Status: up
MII Polling Interval (ms): 100
Up Delay (ms): 0
Down Delay (ms): 0
Peer Notification Delay (ms): 0

Slave Interface: eth0
MII Status: up
Speed: 1000 Mbps
Duplex: full
Link Failure Count: 0
Permanent HW addr: 00:25:90:e0:b6:0e
Slave queue ID: 0

Slave Interface: eth1
MII Status: up
Speed: 1000 Mbps
Duplex: full
Link Failure Count: 0
Permanent HW addr: 00:25:90:e0:b6:0f
Slave queue ID: 0
6-2. eth0 장애 시나리오
# ip link set eth0 down
# cat /proc/net/bonding/bond0
출력 예시:
Ethernet Channel Bonding Driver: v5.14.0-503.14.1.el9_5.x86_64

Bonding Mode: fault-tolerance (active-backup)
Primary Slave: None
Currently Active Slave: eth1
MII Status: up
MII Polling Interval (ms): 100
Up Delay (ms): 0
Down Delay (ms): 0
Peer Notification Delay (ms): 0

Slave Interface: eth0
MII Status: down
Speed: 1000 Mbps
Duplex: full
Link Failure Count: 1
Permanent HW addr: 00:25:90:e0:b6:0e
Slave queue ID: 0

Slave Interface: eth1
MII Status: up
Speed: 1000 Mbps
Duplex: full
Link Failure Count: 0
Permanent HW addr: 00:25:90:e0:b6:0f
Slave queue ID: 0
# ip link set eth0 up
# cat /proc/net/bonding/bond0
출력 예시:
Ethernet Channel Bonding Driver: v5.14.0-503.14.1.el9_5.x86_64

Bonding Mode: fault-tolerance (active-backup)
Primary Slave: None
Currently Active Slave: eth1
MII Status: up
MII Polling Interval (ms): 100
Up Delay (ms): 0
Down Delay (ms): 0
Peer Notification Delay (ms): 0

Slave Interface: eth0
MII Status: up
Speed: 1000 Mbps
Duplex: full
Link Failure Count: 1
Permanent HW addr: 00:25:90:e0:b6:0e
Slave queue ID: 0

Slave Interface: eth1
MII Status: up
Speed: 1000 Mbps
Duplex: full
Link Failure Count: 0
Permanent HW addr: 00:25:90:e0:b6:0f
Slave queue ID: 0
7. Bridge Filter 설정
- 기타 컨테이너 네트워크에서 발생할 수 있는 bridge-nf 관련 오류를 방지하기 위한 설정 가이드입니다.
7-1. sysctl 설정 파일 생성
- bridge 네트워크에서 iptables 처리를 비활성화하여 충돌을 방지합니다.
# vi /etc/sysctl.d/bridge-filter.conf
설정 예시:
net.bridge.bridge-nf-call-ip6tables = 0
net.bridge.bridge-nf-call-iptables = 0
net.bridge.bridge-nf-call-arptables = 0
7-2. udev 규칙 추가
br_netfilter모듈이 로드될 때 위 설정을 자동으로 적용하도록 udev 규칙을 설정합니다.
# vi /etc/udev/rules.d/99-bridge-filter.rules
설정 예시:
ACTION=="add", SUBSYSTEM=="module", KERNEL=="br_netfilter", RUN+="/sbin/sysctl -p /etc/sysctl.d/bridge-filter.conf"
7-3. 부팅 시 모듈 자동 로드 설정
- 시스템 부팅 시
br_netfilter모듈이 자동으로 로드되도록 설정합니다.
# echo "br_netfilter" > /etc/modules-load.d/br_netfilter.conf
7-4. 모듈 로드 및 적용 확인
# lsmod | grep br_netfilter
출력 예시:
# sysctl net.bridge.bridge-nf-call-iptables
# sysctl net.bridge.bridge-nf-call-ip6tables
# sysctl net.bridge.bridge-nf-call-arptables